

In this tutorial, you will learn to:
- Use Python to read the output from a moisture sensor
- Use mu or Thonny editors to debug your micro:bit code
- Calibrate your code to detect the right amount of moisture
You will need
- One Kitronik Prong moisture sensor, assembled with a micro:bit
- A pot plant that has not been watered on the same day
- A micro USB cable to program your micro:bit
- A battery pack (2 x AAA batteries) for the micro:bit
- Mu editor installed on your computer [1]
Note: if you are using a Raspberry Pi to program your micro:bit, you can also use the installed Thonny editor.
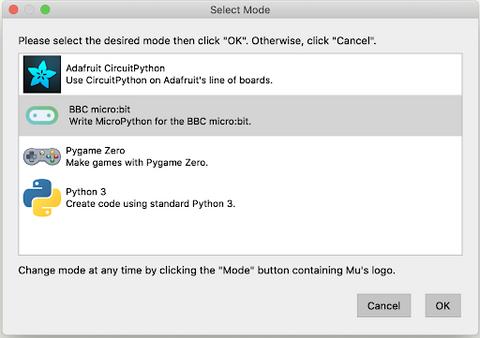
Step 1: Launch an editor, and enable micro:bit mode
Mu editor
- Connect your micro:bit to your computer with the micro USB cable
- Launch mu editor
- Click on the mode
 button in the bottom right of the editor
 - Select BBC micro:bit and click OK

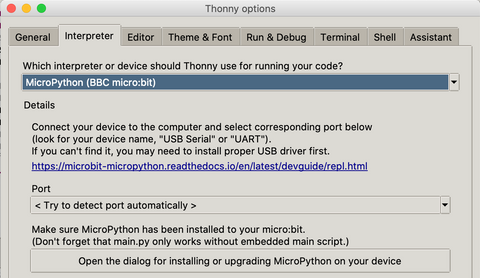
Thonny editor
- Connect your micro:bit to your computer with the micro USB cable
- Launch Thonny editor

- Click on the Thonny menu and select Preferences
- Go to the Interpreter tab and select "MicroPython (BBC micro:bit) then click on OK

Step 2: Write your code
- Create a new file in your editor by clicking on new
 in mu or File > New in Thonny
 - First we need to add a line to import the micro:bit functions:
from microbit import * - Our prong moisture sensor is connected to pin1 of the micro:bit. Add a
while True:loop to repeatedly store the micro:bitpin1value in themoisturevariable:from microbit import * while True: moisture = pin1.read_analog() - Add a
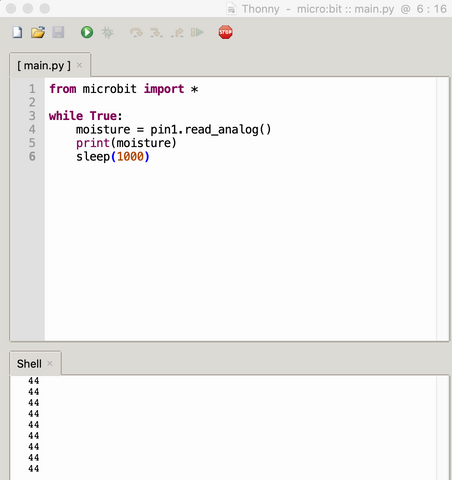
print()command to send themoisturevalue to our editor’s debug console, then use a sleep() command to wait for 1000 milliseconds before repeating:from microbit import * while True: moisture = pin1.read_analog() print(moisture) sleep(1000)
Step 3: Save and run your code
We can save our code to our computer or send it to the micro:bit. It's a good idea to save a copy of our code to the computer first, and then test it on the micro:bit.
On Thonny, when you click on the File > Save As menu item, you can choose whether to save to your computer or your micro:bit. When you save to your micro:bit, overwrite the file,main.py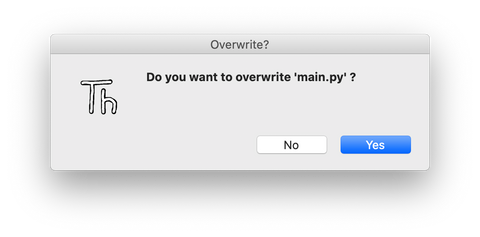

- On mu editor, the Save button lets you save to a location on your computer, but the Flash button is used to save to the micro:bit
- Once the code is saved on the micro:bit it will restart the micro:bit and run it automatically.
On mu editor, you can click the REPL button so you can see the moisture information from the
 print()command.
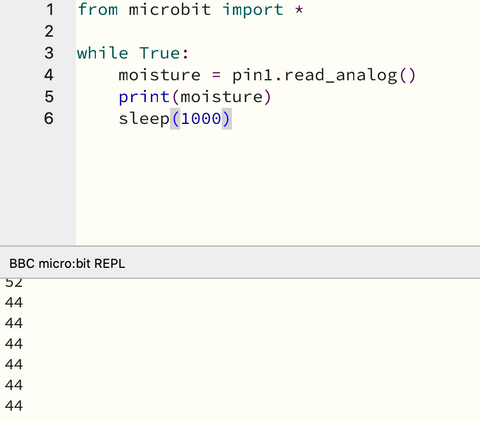
On Thonny, the moisture information will appear in the Shell window below.
- To stop your code running, when using mu, hold down the control key and press c (ctrl-c); or on Thonny, you can click the Stop button.
Step 4: Calibrate your code
Using the shell/REPL, we can view the moisture level as we add water to our plant, and write our code to accurately react to that calibrated moisture level.
- Place the lower part of the prong into the soil of your plant and run your code. Make a note of the number that comes up in the dry soil
- Slowly add water until the soil is moist but not so full that there are puddles. Make a note of the number for the wet soil.
- Update your code to do something when the moisture level is too low, and something else when it is wet enough.
Hint: use anifcommand right after thesleep(1000)command as shown in the example below, and insert the number you recorded earlier for the wet soil.from microbit import * while True: moisture = pin1.read_analog() print(moisture) sleep(1000) if moisture > 400: display.show(Image.HAPPY) else: display.show(Image.SAD)