Project 2: Program Two Traffic Lights

In this project, you will learn:
-
How to write a state table to represent the different changes between two traffic lights.
-
How to reuse our function to save time, and keep our code readable.
-
Send our light changes to another STOP:bit over radio, and write code to match our state table.
You will need:
-
To have completed Project1: Single Traffic Light first.
-
2 x STOP:bits and micro:bits with USB cables.
-
2 x battery packs for our micro:bits.
-
Mu editor installed on your laptop.
Step 1: Extend our truth table to use 2 traffic lights
Here is our previous state table that shows 3 states with 1 traffic light
| State | Red LED | Amber LED | Green LED |
|---|---|---|---|
| green | off | off | on |
| amber | off | on | off |
| red | on | off | off |
We can add another traffic light to our state table - T1 is the first traffic light and T2 is the second traffic light. These traffic lights are arranged on different streets of an intersection (they need to work together to make sure traffic runs smoothly).
| T1 | T1 | T1 | T2 | T2 | T3 | |
|---|---|---|---|---|---|---|
| State | Red LED | Amber LED | Green LED | Red LED | Amber LED | Green LED |
| 1 | off | off | on | on | off | off |
| 2 | off | on | off | on | off | off |
| 3 | on | off | off | off | off | on |
| 4 | on | off | off | off | on | off |
Note: When one traffic light changes to amber, the other traffic light stays red - this gives the traffic enough time and warning to stop, before the traffic from the other street gets the green light to go.
Step 2: Reuse our code
We need to remove the main while loop from our previous code, so that we can make it into a module that we can import.
-
Click on the load
 button in mu, to load our stopbit.py script. Delete the while loop from the bottom of the script so it looks like this:
from microbit import * def stopBit(colour): if colour == "green": pin0.write_digital(0) pin1.write_digital(0) pin2.write_digital(1) elif colour == "amber": pin0.write_digital(0) pin1.write_digital(1) pin2.write_digital(0) elif colour == "red": pin0.write_digital(1) pin1.write_digital(0) pin2.write_digital(0) -
Click the save button in mu, to save your script.
Congratulations, you just made a module that can be imported into other scripts!
Step 3: Copy our module onto the micro:bit
-
Connect the first micro:bit and click the Files
 button in mu. You’ll see two boxes open up at the bottom of mu. Find your stopbit.py module file in the right box, and drag it to the box labelled Files on your micro:bit. If you’ve already got some code flashed on your micro:bit, you’ll see a main.py file there, too.
 -
Repeat the process by plugging in the second micro:bit and clicking Files again, to drag the stopbit.py module to that micro:bit too.
Step 4: Write code for the first micro:bit
Now we can convert the new state table into our main loop on the first micro:bit.
| T1 | T1 | T1 | T2 | T2 | T3 | |
|---|---|---|---|---|---|---|
| State | Red LED | Amber LED | Green LED | Red lED | Amber LED | Green LED |
| 1 | off | off | on | on | off | off |
| 2 | off | on | off | on | off | off |
| 3 | on | off | off | off | off | on |
| 4 | on | off | off | off | on | off |
It looks like a lot of work, but don’t worry because the stopBit() function in our module, does most of the work for us!
-
Click on New
 in mu editor to open up a new tab and add the following code at the top:
from microbit import from stopbit import stopBit -
Because we just imported our stopBit() function, we don’t have to rewrite it!
Add the main while loop below that - this time we have the red and amber function calls too (Remember: the new lines you need to add are the bolded ones)
from microbit import *

from stopbit import stopBit

while True:

    stopBit("green") # state 1

    sleep(5000)

    stopBit("amber") # state 2

    sleep(2500)

    stopBit("red") # state 3

    sleep(2500)

    stopBit("red") # state 4

    sleep(2500)
Flash this to the first micro:bit and check that it cycles through the different colours. The comments help us remember that each stopBit() call corresponds to each of our states.
Step 5: Use radio to send signals (first micro:bit)
-
We need the radio module to be able to send our signals from the first traffic light. Under that, add import radio and code to setup the radio. If you’re near other micro:bits using radio, make sure to set a different channel.
from microbit import * from stopbit import stopBit import radio radio.on() radio.config(channel=7) -
To send a message to the second micro:bit, use the
radio.send()function. For example, to send the message “green”:radio.send("green").In our state table, when Traffic Light 1 has “red” lit, Traffic light 2 has “green” lit.
Looking at the state table, send the corresponding message for Traffic Light 2, under each stopBit() function call.
The code for the first micro:bit should now look like this:from microbit import * from stopbit import stopBit import radio radio.on() radio.config(channel=7) while True: stopBit("green") # state 1 radio.send("red") sleep(5000) stopBit("amber") # state 2 radio.send("red") sleep(2500) stopBit("red") # state 3 radio.send("green") sleep(2500) stopBit("red") # state 4 radio.send("amber") sleep(2500)
Save this code in your mu_code directory as t1.py and then flash it to the first micro:bit.
Step 6: Write code to receive radio (second micro:bit)
The only difference in the second micro:bit is in the main while loop. This time, we just need to call stopBit() whenever we receive a radio message.
-
Connect the second micro:bit to your computer, and click the New button in mu editor, to open a new tab, and copy over the code from t1.py. Now, remove everything after the while True: line in this new tab.
The code in the new tab should look like this:
from microbit import * from stopbit import stopBit import radio radio.on() radio.config(channel=7) while True: -
Now just add three lines to receive and set the LEDs on the second micro:bit.
from microbit import * from stopbit import stopBit import radio radio.on() radio.config(channel=7) while True: incoming = radio.receive() if incoming: stopBit(incoming) -
Save the tab with the above code in the mu_code directory, as t2.py Flash the code onto the second micro:bit and use the Files button to drag the stopbit.py module on.
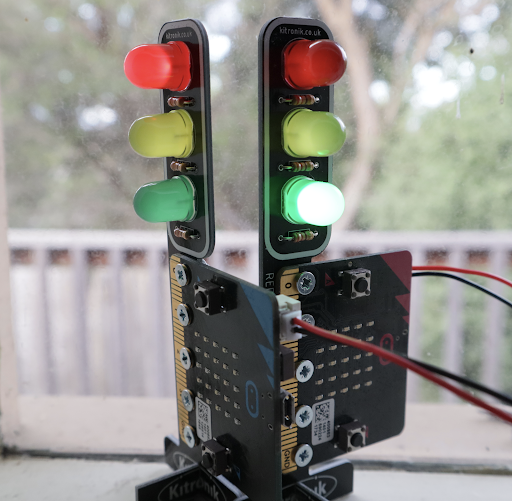
With the STOP:bits connected to each micro:bit, you can now attach a battery pack to each and draw a mini intersection on a piece of paper and watch the lights work together!
Congratulations, you’ve just made a working set of Australian traffic lights!